


As someone who tries hard to make hunting season last throughout the calendar year, nothing helps to cure the post-season blues like searching for the shed antlers from a buck you may have been targeting just a few months earlier. While many would have you believe that there is a science to effective shed hunting, it’s my view that the most effective methods are rooted in the idea that you get out what you put in. That being said, there are a few basic tips that I have picked up over the years that might just help put a few extra antlers in your collection.
Although shed antlers can be found throughout the year, the best and most obvious time to search purposely for them is late winter and early spring, after the testosterone levels in the bucks have dropped to the point of no longer being able to sustain their headgear. Contrary to popular belief, temperature has almost nothing to do with the timing of antler shedding. Although every animal is different, the majority of antlers are dropped by the end of February, with very few hitting the ground beyond the first week of March.
%20cropped.jpg)
I recommend not starting your comprehensive search until around March 15, assuming that there is no snow cover to contend with. In northern states, this may mean waiting a few more weeks until you have barren earth to navigate. Antlers are much easier to spot on leaf-littered ground, and you can see much further during this time, which facilitates more efficient searching. Wait until late spring when new vegetation and leaves have sprouted and you’ll likely be in for a frustrating experience that yields few results.
.jpg)
Unfortunately, there aren’t a lot of secrets to finding antler sheds. Being successful ultimately depends upon your willingness to put in the time and effort. Following a few basic principles and using some simple tools will help you add to your antler collection, while enhancing your overall enjoyment of the experience. Here are some basic tactics I use to increase my level of success:
• Visit known “hot spots” first. Places where you may have found sheds in the past as well as heavily used travel corridors between bedding and feeding areas routinely produce. Finding an antler or two to start the shed searching season can provide a confidence boost.
• Active scrapes and rub lines from the prior season are excellent places to revisit in late March. Bucks will continue to use these scent posts well after the rut and commonly knock fragile antlers loose when working licking branches.
• Once your favorite spots are thoroughly searched, switch your attention to key winter feeding areas, such as grain fields or winterfood plots. These spots tend to be good places to find sheds simply due to the amount of time deer spend there trying to consume as many calories as possible to make it through winter.
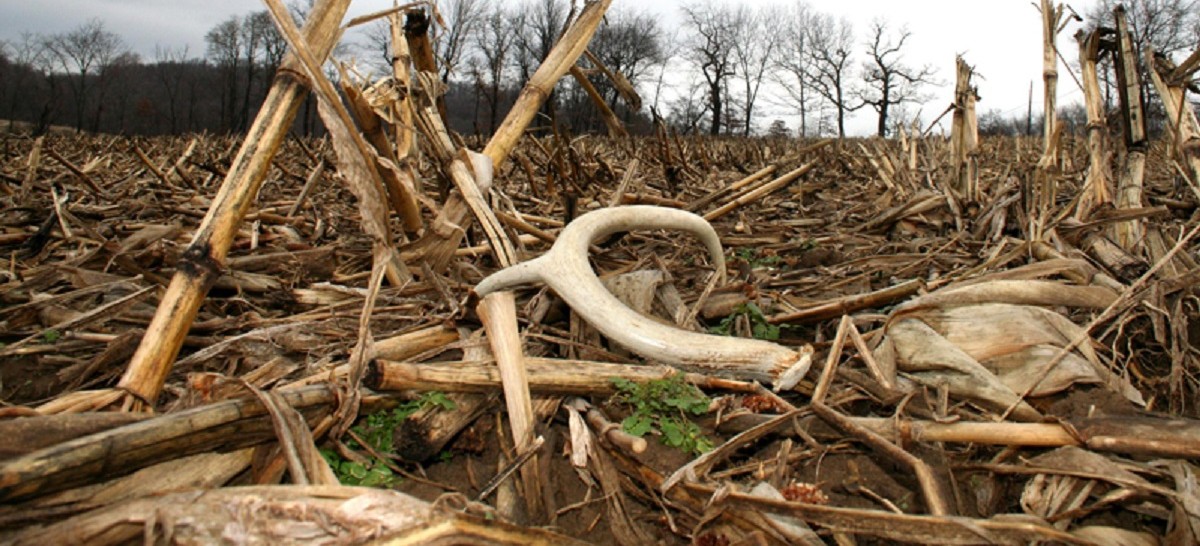
• When searching harvested crop fields, take along some basic wire flags to split the field into sections. This will ensure that you’re covering the entire field, which is particularly important when searching through cut corn stalks. Antlers tend to blend in very well with the downed stalks and leaves, so paying close attention to detail while only searching three to five rows at a time is critical.
.jpg)
• To conclude my annual antler hunt, I search the remaining patches of woods and interior forest. To be sure I’m covering each area adequately, I use flagging tape or toilet paper to section off search lines that I can see from a distance. The advantage of using toilet paper is that it is easy to see, and you don’t have to retrace your steps to collect it as it will break down quickly and disappear into the soil.
• As a general rule, following a back and forth pattern and meticulously searching the ground for any sign of an antler is the most effective. If you catch a glimpse of white or notice any object that could possibly be a shed, be certain to check it out.
• A large percentage of the antlers I’ve found were only showing the top of a tine or two, and were mostly buried under leaf litter. Binoculars can prove very helpful when doing a grid search by saving some walking when checking out potential antlers in the distance.
In addition to the pointers above, I suggest putting together an antler hunting kit, which will provide you with several basic yet important tools each time you head out to search. My kit includes a small bucket that holds flagging tape, wire flags, sack for holding the antlers that I find, GPS unit, camera, paper tags, and pencils to label the tags.
.jpg)
Although it’s not critical, a GPS unit can be used to mark the exact location where you find an antler, or even used to map your path across the landscape as you move about on your search. I like to have a camera along to photograph the sheds that I find, and also because you never know what you’ll encounter while you’re hiking through the woods. I use basic paper tags with small thread loops to attach to the antlers that I find. On the tag, I write the date and some general information about the location for later reference. Once you build up a collection of sheds and you can no longer remember each one, you’ll appreciate this small extra step.
.jpg)
The most important element to successful shed antler hunting is making the time to search,and following some common sense tactics like those described in this article. If you becomediscouraged, take a few days off and resume your hunt in a different area to keep it interesting. One tactic that is certain not to work is staying at home so take advantage of the opportunity to burn some boot leather and you might just be pleasantly surprised by what you find.

